Face detection using Python and OpenCV
In this project-tutorial, we will be learning how to detect human faces in both images and videos using the OpenCV library package in Python. For this project we will be using the Haar-Cascade Classifiers (pre-trained classifiers for face, eyes, eye-glasses, smile, etc detection). In the first part, we will detect faces in an image and in the second part, we will detect faces in a video captured using a webcam or a loaded a video file.
Requirements:
1 – Python 3.0 and above
2 – PyCharm IDE or Visual Studio Code IDE or Anaconda or any other IDE of your choice.
3 – OpenCV library package
What is OpenCV
OpenCV (Open Source Computer Vision Library) is an open source computer vision and machine learning software library. OpenCV was built to provide a common infrastructure for computer vision applications and to accelerate the use of machine perception in the commercial products. Being a BSD-licensed product, OpenCV makes it easy for businesses to utilize and modify the code.
The library has more than 2500 optimized algorithms, which includes a comprehensive set of both classic and state-of-the-art computer vision and machine learning algorithms. These algorithms can be used to detect and recognize faces, identify objects, classify human actions in videos, track camera movements, track moving objects, etc..
Read more about OpenCV here… https://opencv.org/about/
Face detection Vs Face recognition
Face detection and face recognition are two terms that somewhat sound similar but they are not. Let’s distinguish the two; Face detection is basically the process of detecting human faces from an image or a video and here the program all it does is to detect faces and nothing more whereas on the other hand, Face recognition involves detecting the faces in either an image or a video file and the program is also able to tell which face belongs to who. So basically recognition has more to it than detection and for this tutorial, we’ll only tackle face detection.
Part-1: Face Detection in Images:
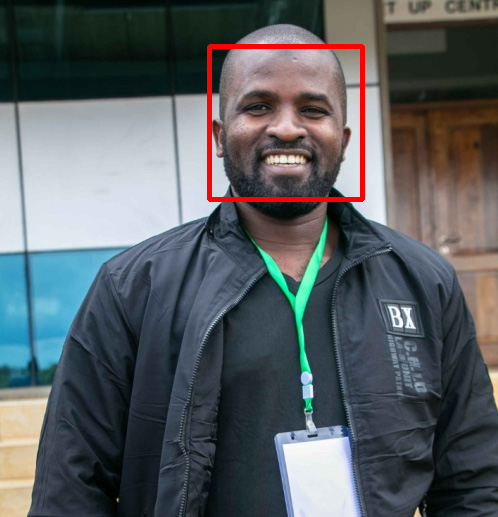
In part-1 we will detect faces in an image and we will save the detected face image to our project folder.
Step-1: Install & Import OpenCV
Create a new python file in your IDE and give it a name of your choosing. The main library package that we will be using for this project is OpenCV, so we need to install and import OpenCV as shown below; To install it, run the code snippet below in the Terminal window of your IDE.
pip install opencv-python
To import OpenCV, just simply write this code;
# Import the required library
import cv2
Step-2: Load the test image
Here we need to add a sample image that we want to test with, ensure that the image is well lit and the faces are clearly seen. For this, i will use a photo of me while i was attending a Data-Science workshop event and to do this, we need to use this code; The function imread() is used here to load images from the specified file and return it as a numpy N-dimensional array.
# Read the input image
test_image = cv2.imread('tumz.png')
Step-3: Convert to grayscale
The function that we will use to detect faces, expects a grayscale image that’s why we need to convert the image to grayscale as shown in the code below; The function cvtColor() is used to covert an input image from one color space to another. So as you can see, it takes two parameters, one for the test image and the other for the color conversion. In this case “cv2.COLOR_BGR2GRAY” simply means covert BGR (Blue Green Red) to grayscale.
# Convert to grayscale
gray = cv2.cvtColor(test_image, cv2.COLOR_BGR2GRAY)
Step-4: Initialize & load the HaarCascade Classifier
First of all, we will need to download the trained classifier XML file (“haarcascade_frontalface_default.xml“) and add it to our project folder. This XML file is available and it can be downloaded from the OpenCV’s GitHub Repository. Save a copy of this xml file in your project directory and to load the classifier to the project, we shall use the cv2.CascadeClassifier() function as shown in the code snippet below;
# Initialize & load the cascade classifier
face_cascade = cv2.CascadeClassifier(cv2.data.haarcascades + 'haarcascade_frontalface_default.xml')
Step-5: Detect Faces in the image
To detect faces in the image, we use this line of code and then after we print out the detected number of faces in the test image.
# Detect faces in the image
faces = face_cascade.detectMultiScale(gray, 1.2, 4)

# Print the number of faces detected
print(f"{len(faces)} faces detected in the image.")
In the code above, the detectMultiScale() function is used to detect faces and it takes 3 arguments, i.e the input gray image, the scaleFactor (1.2) and the minNeighbours (4). The “scaleFactor” specifies how much the image size is reduced with each scale and the “minNeighbours” specifies how many neighbors each candidate rectangle should have to retain it. You will have to tweak these parameters in order to get good results.
Step-6: Draw rectangles around the Faces
Here we use the cv2.rectangle() function to draw rectangular shapes around the detected faces in the image. The faces variable contains a list of coordinates for the rectangular regions where faces were found and we use these coordinates to draw the rectangles on our image.
# Draw rectangles around the faces in the image
for (x, y, w, h) in faces: # Where w = width and h = height
    cv2.rectangle(test_image, (x, y), (x+w, y+h), (0, 0, 255), 3)
Step-7: Show and save the detected image
Use the cv2.imshow() function to show the detected faces in the image and use the cv2.imwrite() function to save the detected image to your project folder as shown below.
# Show the faces found
cv2.imshow("Faces Found", test_image)

# Save the detected image to your project folder
cv2.imwrite("face_detected.png", test_image)

print('Successfully saved')
Full Code for Part-1 (Image Capture):
Here is the full code of detecting faces in an image using the Haarcascade trained classifier.
# Import the required library
import cv2

# Read the input image
test_image = cv2.imread('tumz.png')

# Convert to grayscale
gray = cv2.cvtColor(test_image, cv2.COLOR_BGR2GRAY)

# Initialize the cascade classifier
face_cascade = cv2.CascadeClassifier(cv2.data.haarcascades + 'haarcascade_frontalface_default.xml')

# Detect the faces
faces = face_cascade.detectMultiScale(gray, 1.2, 4)

# print the number of faces detected
print(f"{len(faces)} faces detected in the image.")

# Draw rectangles around the faces in the image
for (x, y, w, h) in faces: #where w = width and h = height
    cv2.rectangle(test_image, (x, y), (x+w, y+h), (0, 0, 255), 3)

# Show the faces found
cv2.imshow("Faces Found", test_image)

# Save the detected image to your project folder
cv2.imwrite("face_detected.png", test_image)

print('Successfully saved')
Results for Part-1 (Image-Capture):

Part-2: Face & Eye Detection in Videos:
Just like with images, we can also detect faces in videos too since we know videos are basically made up of frames which are still images and so to do this, we shall perform face detection for each frame in a video file. For this project, we will be using our laptop webcam to capture the video but you can also load a video file as shown in the code below;
We will also detect eyes in the faces and to do this we will use a pre-trained classifier “haarcascade_eye.xml” that you can also find in the OpenCV’s GitHub Repository. Save a copy of this xml file in your project directory and to load the classifier to the project, we shall use the cv2.CascadeClassifier() function as shown in the code snippet below;
For face detection in videos, we use an infinite while loop to loop through each frame of the video and we use the vid_cap.read() function to read each frame. This function returns two values where the first value returned is a flag that indicates if the frame was read correctly or not and the second value returned is the still frame on which we will be performing the detection.
Full Code for Part-2:
# Import the required libraries
import cv2

# Read the input video from the webcam
vid_cap = cv2.VideoCapture(0)

# Alternatively you can use a video file
#vid_cap = cv2.VideoCapture("filename.mp4")

# Load the default face cascade
face_cascade = cv2.CascadeClassifier(cv2.data.haarcascades + 'haarcascade_frontalface_default.xml')

# Load the eyes cascade to detect eyes too
eye_cascade = cv2.CascadeClassifier(cv2.data.haarcascades + 'haarcascade_eye.xml')

while True:
    # Read the frame
    ret, frame = vid_cap.read()

    #Convert video images to grayscale
    gray = cv2.cvtColor(frame, cv2.COLOR_BGR2GRAY)

    # Detect the faces
    faces = face_cascade.detectMultiScale(gray, 1.2, 4)

    # Draw rectangles around each face
    for (x, y, w, h) in faces: #where w = width and h = height
        cv2.rectangle(frame, (x, y), (x+w, y+h), (0, 0, 255), 3)
        roi_gray = gray[x:x+w, y:y+w]
        roi_color = frame[x:x+h, y:y+w]

        # Detect eyes in the face(s)
        eyes = eye_cascade.detectMultiScale(roi_gray, 1.2, 4)

        # Draw rectangles around the eyes in the face(s)
        for (ex,ey,ew,eh) in eyes:
            cv2.rectangle(roi_color,(ex,ey),(ex+ew,ey+eh),(0,255,0),2)

    # Display the captures/loaded video with the face detection
    cv2.imshow('WebCam - FaceCapture', frame)

    # Close the window (quit) if "q" is pressed
    if cv2.waitKey(1) == ord('q'):
        break

# Release the VideoCapture object
vid_cap.release()

# Close out
cv2.destroyAllWindows()
print('Successfully Captured')
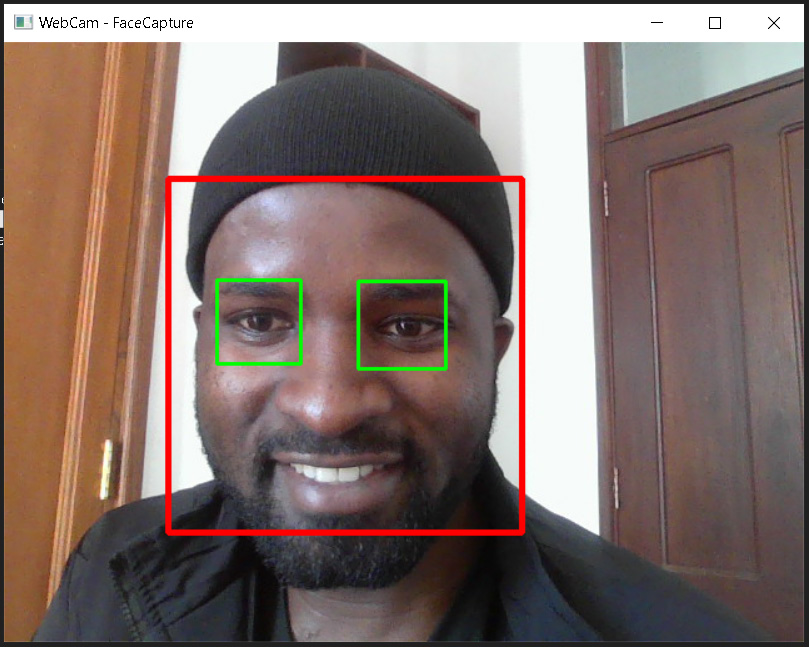
Results for Part-2 (Video capture):
Upon running the above code (assuming you have a webcam on your machine), a window will popup with a captured video from your webcam and the program will start drawing rectangular shapes around all the faces and eyes detected in the video as shown below.

References:
[1]. OpenCV website: https://opencv.org/about/
[2]. OpenCV Documentation: https://docs.opencv.org/4.x/d9/df8/tutorial_root.html
If you liked this project-tutorial, please subscribe to our YouTube Channel for more D.I.Y tutorials and projects.
Leave a comment down below incase you have any concerns…
Follow us on our different social media platforms;- LinkedIn, Facebook, Instagram, TikTok, & Pinterest.

About the Author…
Tumusiime Kwiringira a.k.a Tum, is an embedded systems engineer, D.I.Y Life Hacker, Tech Blogger, YouTuber, Founder and Lead-Engineer at sonalabs.org. He’s passionate about innovation and building D.I.Y projects to inspire the young generation in the fields of Mechatronics and Artificial Intelligence… Read more…


[…] Face detection using Python and OpenCV […]