Accurate face detection using a Deep Neural Network
In this project-tutorial, we will be learning how to detect human faces accurately using a deep neural network (dnn) module which comes pre-bundled within the OpenCV (cv2 package) library package. This module allows us to make inference on pre-trained deep-learning models.
Requirements:
1 – Python 3.0 and above
2 – PyCharm IDE or Visual Studio Code IDE or Anaconda or any other IDE of your choice.
This project builds upon what we covered in the previous tutorial where we introduced what OpenCV is and we also differentiated between Face detection and Face recognition incase you’re wondering what’s the distinction between the two.
The previous project-tutorial can be found here;
Face detection using Python and OpenCV
For this tutorial, we shall follow the steps below;
Step-1: Install and Import the required libraries
Create a new python file in your IDE and give it a name of your choosing. The two main library packages that we will be using for this project are OpenCV and Numpy, and these two libraries don’t come pre-installed with Python, so we need to install and import them as shown below;
Run the code snippet below in the Terminal window of your IDE to install both OpenCV and Numpy at once.
pip install opencv-python numpyTo import the two libraries, just simply write these two lines of code
# Import the required libraries
import cv2
import numpy as np
Step-2: Download the model with its weights
For us to be able to detect faces using this method, we need to download the following files;
We then need to save the above files to a folder called “weights” in our project directory and initialize them in our code as shown below;
# Create variables to hold the model with the pre-trained weights...
prototxt_path = "weights/deploy.prototxt.txt"
model_path = "weights/res10_300x300_ssd_iter_140000_fp16.caffemodel"
Step-3: Load the model
To load the actual model, we need to use the readNetFromCaffe() method which takes the model architecture and weight as arguments.
# Load the Model...
model = cv2.dnn.readNetFromCaffe(prototxt_path, model_path)
Step-4: Read the test image
Here we use the imread() function to read the test image. Make sure you add your test image to the project folder. We then capture the height and width of the test image.
# Read the Test Image...
test_image = cv2.imread("faces.jpg")
# capture the height and width of the test image
height, width = test_image.shape[:2]
Step-5: Preprocess the image
Before we pass our image into the neural network, we need to preprocess it, that is, we need to resize it to a size of (300, 300) and also do a mean subtraction since it is trained that way.
# Preprocess the image...
blob = cv2.dnn.blobFromImage(test_image, 1.0, (350, 350), (104.0, 177.0, 123.0))
Step-6: Detect the faces
For this, we shall use the object (“blob”) above as the input of the network and perform feed forward to get the detected faces.
# Input the image into the Neural-Network
model.setInput(blob)

# Perform feed forward to get detected faces
output = np.squeeze(model.forward())
Step-7: Draw rectangles around the detected faces
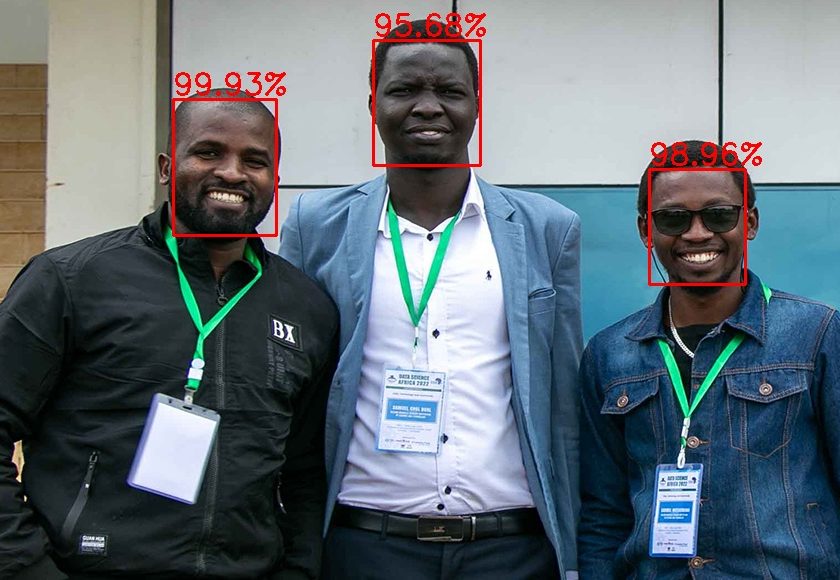
After the feed forward is done, the output object (from above) now has all the faces, so we need to iterate over this array and draw rectangles around all the detected faces in the image with a confidence of more than 50%. Since we resized the image previously to (300,300), this means the output should also be between 0 and 300 as well and this is achieved by getting the surrounding box and multiply it by the width and height of the original image to get the right box coordinates. we also need to include some text that shows the confidence of the model as a percentage as shown in the code below.
font_scale = 1.0
for i in range(0, output.shape[0]):
    confidence = output[i, 2]   # Get the confidence
    # If confidence is above 50%, draw the surrounding box
    if confidence > 0.5:
       # Upscale surrounding box coordinates to the original image.
        box = output[i, 3:7]*np.array([width, height, width, height])
        # Covert to integers
        start_x, start_y, end_x, end_y = box.astype(np.int)
        # Draw the rectangle surrounding the face
        cv2.rectangle(test_image, (start_x, start_y), (end_x, end_y), color=(0,0,255), thickness=2)
        # Add text that shows the confidence of the model as a %.
        cv2.putText(test_image, f"{confidence*100:.2f}%", (start_x, start_y-5), cv2.FONT_HERSHEY_SIMPLEX, font_scale, (0,0,255), 2)
After that, we can show and save the image with the detected faces.
Here is the Full Code:
# Import the required libraries...
import cv2
import numpy as np

# Create variables to hold the model with the pre-trained weights...
prototxt_path = "weights/deploy.prototxt.txt"
model_path = "weights/res10_300x300_ssd_iter_140000_fp16.caffemodel"

# Load the Model...
model = cv2.dnn.readNetFromCaffe(prototxt_path, model_path)

# Read the Test Image...
test_image = cv2.imread("faces.jpg")

# Capture the height and width of the test image
height, width = test_image.shape[:2]

# Preprocess the image (resize & perform mean subtraction)
blob = cv2.dnn.blobFromImage(test_image, 1.0, (350, 350), (104.0, 177.0, 123.0))

# Input the image into the Neural-Network
model.setInput(blob)

# Perform feed forward to get detected faces
output = np.squeeze(model.forward())

font_scale = 1.0
for i in range(0, output.shape[0]):
    confidence = output[i, 2]   # Get the confidence

    # If confidence is above 50%, draw the surrounding box
    if confidence > 0.5:

        # Upscale surrounding box coordinates to the original image
        box = output[i, 3:7]*np.array([width, height, width, height])
        # Covert to integers
        start_x, start_y, end_x, end_y = box.astype(np.int)

        # Draw the rectangle surrounding the face
        cv2.rectangle(test_image, (start_x, start_y), (end_x, end_y), color=(0,0,255), thickness=2)

        # Add text that shows the confidence of the model
        cv2.putText(test_image, f"{confidence*100:.2f}%", (start_x, start_y-5), cv2.FONT_HERSHEY_SIMPLEX, font_scale, (0,0,255), 2)

        # show the image
        cv2.imshow("test_image", test_image)

        # save the detected faces image with rectangles
        cv2.imwrite("Detected_faces.jpg", test_image)
The Final Result – Faces Detected
Download the Project Files here:
https://github.com/tumusiimek/python-beginner-projects/tree/main/face-ssd-dnn
References:
[1]. OpenCV website: https://opencv.org/about/
[2]. OpenCV Documentation: https://docs.opencv.org/4.x/d9/df8/tutorial_root.html
[3]. Numpy Documentation: https://numpy.org/doc/stable/
[4]. The Python Code: https://www.thepythoncode.com/
If you liked this project-tutorial, please subscribe to our YouTube Channel for more D.I.Y tutorials and projects.
Leave a comment down below incase you have any concerns…
Follow us on our different platforms;- LinkedIn, Facebook, Instagram, TikTok, & Pinterest.

About the Author…
Tumusiime Kwiringira a.k.a Tum, is an embedded systems engineer, D.I.Y Life Hacker, Tech Blogger, YouTuber, Founder and Lead-Engineer at sonalabs.org. He’s passionate about innovation and building D.I.Y projects to inspire the young generation in the fields of Mechatronics and Artificial Intelligence… Read more…


