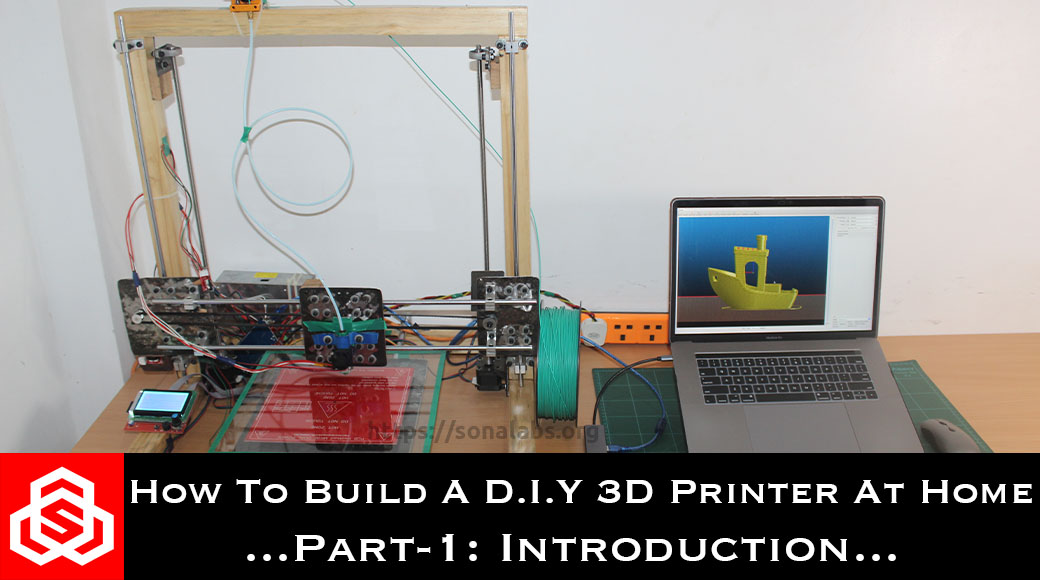
How to build a D.I.Y 3D Printer at Home. Part-1 – Introduction
In this project-tutorial, we will be learning how to build our own D.I.Y 3D Printer from scratch at home that is capable of Printing three-dimensional objects.
But first, let’s introduce some common terms used in 3D Printing.
What is 3D Printing?
The term 3D Printing which is also known as additive manufacturing is a method of creating three-dimensional tangible/solid objects by laying down very many successive layers of the plastic filament (layer-by-layer) using a computer aided design (CAD) model or a digital 3D model. 3D Printing is achieved in a number of ways in which materials are deposited, joined or solidified under computer control with the materials being added together typically layer-by-layer.
What are the different types of 3D Printing Technology?
There are many different 3D printing technologies out there but the three most common are; Fused Deposition Modeling (FDM), Stereolithography (SLA) and Selective Laser Sintering (SLS). The other unpopular types include; Digital Light Processing (DLP), Selective Laser Melting (SLM), Electron Beam Melting (EBM), Laminated Object Manufacturing (LOM), Binder Jetting (BJ), and many others.
Let’s look at the three most common 3D Printing Technologies.
Fused Deposition Modeling
This method is also known as Fused Filament Fabrication and in this method, a thermoplastic material/metal wire or other material is fed into an extrusion nozzle head called a 3D Printer Extruder which then heats the materials to produce the layers of the object being printed. So basically the model or 3D object is produced by extruding small beads or streams of material which harden immediately to form layers.
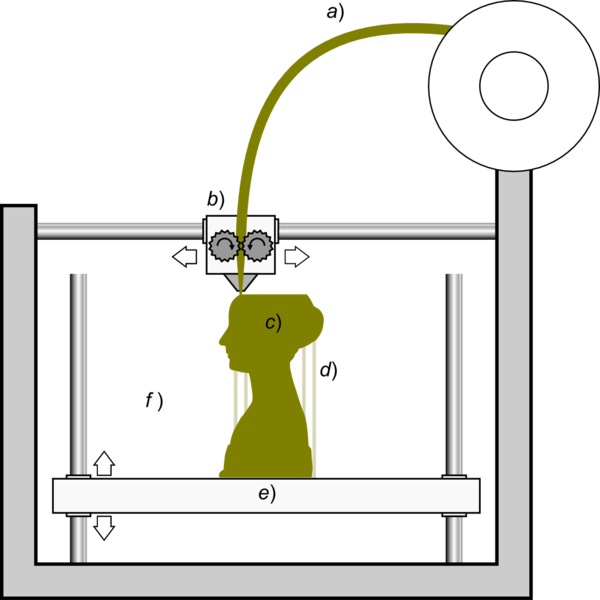
Image-Source: https://en.wikipedia.org/wiki/Fused_deposition_modeling
In the figure-1 above, the thermoplastic filament material (a) is fed through a heated moving head (b) that melts and extrudes it depositing it layer after layer in the desired shape (c). A moving platform (e) lowers after each layer is deposited and in some designs it moves up after each layer is deposited. Vertical structures (d) are required to sustain the overhanging parts of the printed object.
Stereolithography
This method is used for creating models, prototypes, patterns and production parts in a layer-by-layer fashion using photochemical processes by which light causes chemical monomers and oligomers to cross-link together to form polymers and these polymers then make up the body of a three-dimensional solid object.
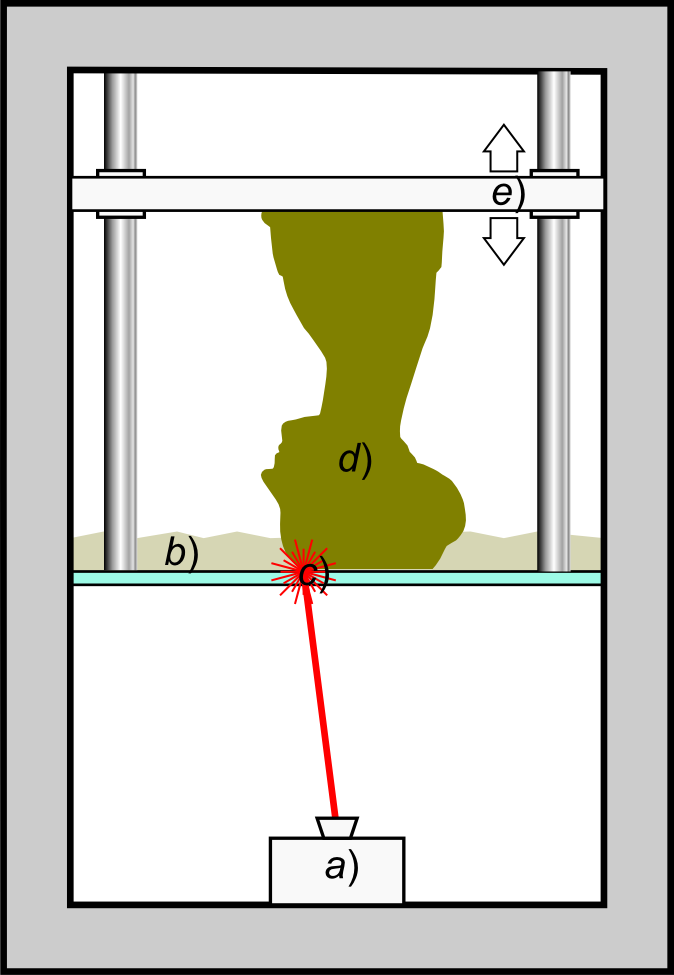
Image-Source: https://en.wikipedia.org/wiki/Stereolithography
In the figure-2 above, a laser (light-emitting-device) (a) at the bottom selectively illuminates the transparent bottom platform (c) of a tank (b) that is filled with a liquid photo-polymerizing resin. The solidified resin (d) is progressively dragged up by a lifting platform (e). The beam is focused onto the surface of the liquid photopolymer creating each layer of the desired 3D object by means of crosslinking.
Selective Laser Sintering
This method uses a laser as the power and heat source to sinter powdered material typically nylon or polyamide aiming the laser automatically at points in space defined by a 3D model, binding the material together to create a solid structure. SLS is a relatively new technology that so far has mainly been used for rapid prototyping and for low-volume production of component parts.
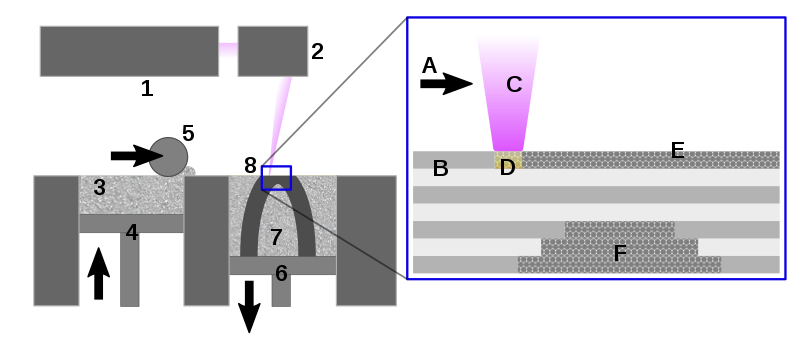
Image-Source:
https://en.wikipedia.org/wiki/Selective_laser_sintering
In the figure-3 above, we have the SLS process in the steps below;
1 Laser 2 Scanner system 3 Powder delivery system 4 Powder delivery piston 5 Roller 6 Fabrication piston 7 Fabrication powder bed 8 Object being fabricated (see inset) A Laser scanning direction B Sintered powder particles (brown state) C Laser beam D Laser sintering E Pre-placed powder bed (green state) F Unsintered material in previous layers
Applications of 3D Printing technology.
3D Printing technology can be applied in a number of industries which include but not limited to the following;
- Automotive Industry
- Fashion Industry
- Health Sector
- Firearm Industry
- Education sector and many more…
Building our D.I.Y 3D Printer
In the above introduction, we introduced you to 3D Printing technology and we also looked at the different types of 3D Printing technologies where the three main types were FDM, SLA and SLS.
In our D.I.Y 3D Printer build, we will use the FDM method.
Requirements for the build
In order to achieve our intended goal of building a D.I.Y 3D Printer, we will need both mechanical and electrical/electronics components as shown in the tables below.
Please note that, the links added below are none-affiliate links, these are the actual links we used to buy the components from AliExpress. You can buy these components elsewhere…
The Mechanical Components
| S/N | Name of Component | Quantity (Pcs) |
| 1. | 12mm Diameter steel Rod | x2 |
| 2. | 8mm Diameter steel Rod | x4 |
| 3. | SC12UU Aluminum Linear Motion Ball Bearing Slide Bushing | x4 |
| 4. | SC8UU Aluminum Linear Motion Ball Bearing Slide Bushing | x8 |
| 5. | SK12UU Linear Rail Shaft Rod holders | x4 |
| 6. | SK8UU Linear Rail Shaft Rod holders | x8 |
| 7. | Pedestal bearing 8mm KP08 | x2 |
| 8. | T8 8mm Lead Screws with Nut | x2 |
| 9. | Stepper motor couplers 5mm to 8mm | x2 |
| 10. | GT2 20 tooth flanged pulley for 5 mm shaft | x2 |
| 11. | Timing belt (5 meters) | x1 |
| 12. | Nema17 Mounting Brackets | x4 |
| 13. | Metallic sheet (300mm x 300mm x 300mm), 1.5mm thickness – (Was fabricated locally) | x1 |
| 14. | Metallic sheets (140mm x 140mm), (140mm x 150mm), & (140mm x 130mm) – (Was fabricated locally) | x3 |
| 15. | Angle brackets (160mm x 40mm) – (Was fabricated locally) | x2 |
| 16. | Hex screws-nut Set (Different sizes) | x1 screw set |
The Electronics components:
| S/N | Name of Component | Quantity (Pcs) |
| 1. | Arduino Mega 2560 board | x1 |
| 2. | RAMPS 1.4 Shield board | x1 |
| 3. | A4988 Stepper Motor drivers (You could use DRV8825 motor drivers instead) | x4 |
| 4. | Mechanical End-stops | x3 |
| Smart LCD 12864 Controller Control Panel | x1 | |
| 5. | Power Supply (12v, 20A) | x1 |
| 6. | PLA Filament for 3D Printer (1.75mm) | x1 |
| 7. | E3D Hotend Extruder kit | x1 |
| 8. | Nema-17 Stepper Motors | x5 |
| 9. | MK8 Filament Extruder | x1 |
| 10. | Electrical wires (Red and Black, 18AWG) – 1 mtr. | x2 |
| 11. | Jumper wires | x1 set |
The required Software applications
| S/N | Name of Required Software (Open-source Software) | Quantity |
| 1. | Arduino IDE | x1 |
| 2. | Slicer | x1 |
| 3. | Printrun Pronterface | x1 |
| 4. | Merlin Firmware | x1 |
| 5. | ESP3D Library | x1 |
The required hand tools
| S/N | Name of required tool (these can be obtained locally) | Quantity (Pcs) |
| 1. | Drill Machine with drill bits | x1 plus a set of drill bits |
| 2. | Grinding Machine | x1 |
| 3. | Allen Keys | x1Pack |
| 4. | x1 |
Conclusion
In this introductory tutorial, Part-1 of the D.I.Y 3D Printer build series, we’ve learnt about what 3D printing is and the different types of 3D Printing technologies that are out there. We also expounded more on the three most common 3D Printing technologies that is FDM, SLA, and SLS and then we moved on to the build process of our D.I.Y 3D Printer where in this tutorial we’ve simply outlined the necessary requirements and tools for building our own D.I.Y 3D Printer.
In the next project-tutorial, Part-2 of the 3D Printer build series, we will be looking at the mechanical build.
If you liked this project-tutorial, please subscribe to our YouTube Channel for more D.I.Y tutorials and projects.
Leave a comment down below incase you have any concerns…
Follow us on our different social media platforms;- LinkedIn, Facebook, Instagram, TikTok, & Pinterest.


