How to build a Digital Clock using Python
In this Project-tutorial, we are going to learn how to build a simple Digital-Clock using Python. This is a beginner project to help you learn more about how to build python applications with a Graphical User Interface.
Requirements:
1 – Python 3.0 and above
2 – PyCharm IDE or Visual Studio Code IDE or any other IDE of your choice
This project is divided into two parts, in part one, we will be mainly using a library package known as TKInter and in part two, we will mainly use a library package known as Pygame.
Part 1: – Digital Clock using TKInter package
The tkinter (“Tk interface”) is the standard Python interface to the Tcl/Tk Graphical User Interface (GUI) toolkit. The Tcl/Tk is not a single library but rather consists of a few distinct modules each with separate functionality.
For our Digital Clock project, we will use two library packages, that is; TKInter and time, the good news is that these are built-in packages, they come pre-installed with Python so there is no need of pip install.
So let’s dive right in and build our program;
Step-1: – Import the Required Libraries
To do this, we just have to write the following two lines of code
import time
from tkinter import *
Step-2: – Design the clock-app window
We shall begin by defining the TKInter function, give our application a name, define the size of the application window and make it un-resizable since the text is not responsive as shown in the code below.
# TKInter function definition
window = Tk()
# Give our application a name
window.title("Digital Clock")
# Define the size of the app window
window.geometry("450x180")
# make the windows un-resizable
window.resizable(0,0)
Step-3: – Add a tittle bar icon
To achieve this, we will need to use the iconphoto() method. This python method is used to set the title-bar icon of any tkinter/top level window. But for us to set any image as the icon of the title-bar, the image should be the object of PhotoImage class as shown in the code below;
icon = PhotoImage(file="clock-icon.png")
window.iconphoto(False, icon)
Step-4: – Label design
The Label function is the text that will show our time and this is where we design and customize our application according to our preferences, here we define the background color, foreground color, the font style and the boarder width of the text. Specify the rows and columns of our app. This can be done in two lines of code as shown below;
label = Label(window, font=("banschrift", 70, 'bold'), bg="#de0303", fg="#ffffff", bd=40)
label.grid(row=0, column=1)
Step-5: – Define the digital clock function
Functions help us to structure our program and make it easier to understand. They come in very handy most especially when dealing with complex programs with more lines of code. So for our digital clock app, we define our function as below; We begin by getting real-time using the time package and assigning it to a variable (“real_time”). In the same line, we also define the format that we want for our digital clock to look like that is, (hours, minutes, seconds). We then assign the real_time to the label method and this will update the digital time and finally we do a recursion loop by calling the digital_clock function with in the label function so that the digital clock shows live time. The 200 in the function is to simply indicate that every 200 milliseconds, the time is getting updated.
def digital_clock():
    real_time = time.strftime("%H:%M:%S")
    label.config(text=real_time)
    label.after(200, digital_clock)
Step-6: – Run the application
Finally to get our clock app running, we need to call the digital_clock() function as you well know functions cannot run unless they’re called. The last line of code “window.mainloop()” simply tells Python to run the TKinter event loop. This is simply a method in the main window that executes what we wish to execute in an application. This method listens for events such as button clicks or keypresses and blocks any code that comes after it from running until you close the window where you called the method.
digital_clock()
window.mainloop()
The full code of Part1 – using Tkinter:
At the end of it all, this is the full code;
# Import Libraries...
import time
from tkinter import *

# Design the clock-app window
window = Tk()
window.title("Digital Clock")
window.geometry("450x180")
window.resizable(0,0)

# Add a tittle bar icon
icon = PhotoImage(file="clock-icon.png")
window.iconphoto(False, icon)

# Label design
label = Label(window, font=("banschrift", 70, 'bold'), bg="#de0303", fg="#ffffff", bd=40)
label.grid(row=0, column=1)

# Clock function definition
def digital_clock():
    real_time = time.strftime("%H:%M:%S")
    label.config(text=real_time)
    label.after(200, digital_clock)

# Run the application by calling the function
digital_clock()
window.mainloop()
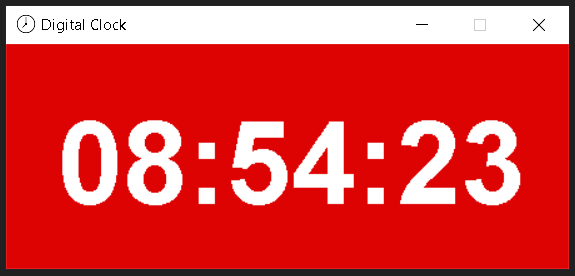
The Final Result of Part-1:
Upon running the above code, you should have the digital clock app as shown below;
Part 2: – Digital Clock using Pygame package
Pygame is a cross-platform python library package that is mainly used for the development of multimedia applications like video games. We’re however, going to attempt to use it to design and build a simple digital clock.
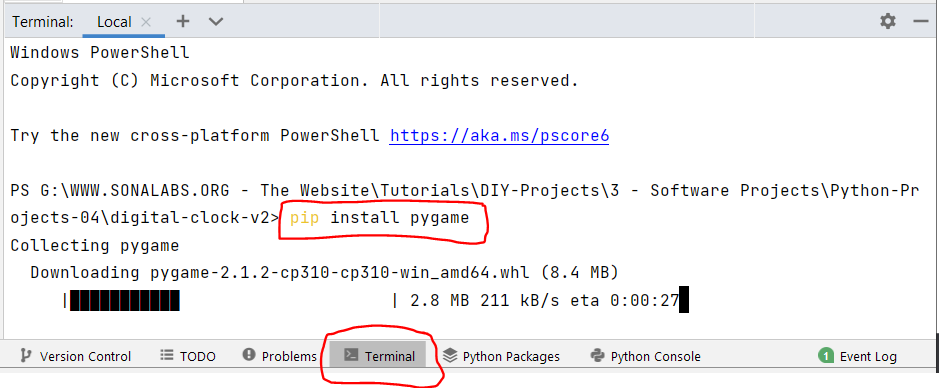
Unlike TKinter, pygame is not built-in within python so this means for us to use it, we need to first of all install it into our IDE (we’ll still use PyCharm IDE) and to do this, we run the code below in the terminal window of the IDE;
pip install pygame
Step-1: – Import pygame library & initialize it.
To do this, we just have to write the following two lines of code;
import pygame
pygame.init()
Step-2: – Design the clock app-window;
Here we will define the size of the window, add the caption and we will also add an icon. The icon image must be added to the project folder. Free icons can be obtained or downloaded from here https://icons8.com/.
# Add an icon to the Clock-App Window...
icon = pygame.image.load('clock-icon.png')
pygame.display.set_icon(icon)

# Define the window screen size and add a caption...
screen = pygame.display.set_mode((470,180))
pygame.display.set_caption('Digital Clock')
Step-3: – Sample run the application
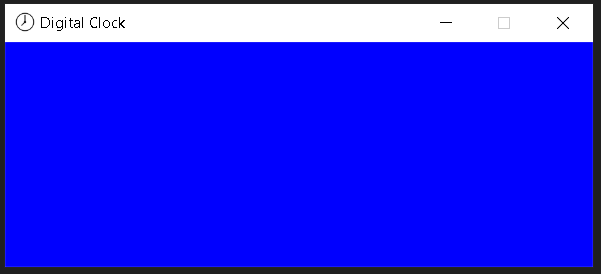
Here we will create a while loop to make it run until the exit button is pressed and we will update the pygame display as shown below;
blue = (0,0,255) # using the RGB color scheme...
running = True
while running:
    screen.fill(blue) #fill with blue color

    for event in pygame.event.get():
        if event.type == pygame.QUIT:
            running = False
            pygame.quit()
    pygame.display.update()
The code above should give us the following window shown below;
Step-4: – Add the time functionality
To add time, we need to import datetime from datetime. The good thing is that this library comes pre-installed with Python, so we don’t have to pre-install it. We also need to capture the current time and define the format of the digital clock. We prefer to use this format of Hours, Minutes and Seconds, so we’ll go with that.
We’ll create a variable called time_now and set it to datetime.now() function and then make another variable called time and set it to now.starftime(%H:%M:%S) as shown below; Add this code to the while loop and run the program.
from datetime import datetime

time_now = datetime.now()
time = time_now.strftime('%H:%M:%S')
print(time)
Upon running the above code, it gives time in 24 hour-system. In case you prefer the 12-hour system, you’ll need to split the time variable as minutes and hour and since these return number in string format, we need to change it back to integer as indicated below;
minute = time_now.strftime('%M:%S')
hour = int(time_now.strftime('%H'))
If the hour variable is greater than 12, we need to subtract 12 from it and create a new variable “time” to store these values as an f-string as shown below;
if hour > 12:
   hour = hour-12
time = f'{hour}:{minute}'
So to display the time in the pygame window, we need a font so we will create a variable for the font as shown below; We also need to give a color to our font-text as shown below;
white = (255,255,255)
# Banschrift is the font style and 120 is the font size.
font = pygame.font.SysFont('Banschrift', 120)

# Add this to the while loop
text = font.render(time,True,white)
screen.blit(text,(50,50))
The full code for displaying the time using pygame as explained above is as shown below;
# Import the required libraries...
import pygame
from datetime import datetime

# Initialize pygame
pygame.init()

# Add an icon to the Digital Clock window
icon = pygame.image.load('clock-icon.png')
pygame.display.set_icon(icon)

# Define the size of the pygame window and add a caption
screen = pygame.display.set_mode((470,180))
pygame.display.set_caption('Digital Clock')

# Add a font and specify the font size.
font = pygame.font.SysFont('Banschrift', 120)

# Define the colors to be used
blue = (0,0,255)
white = (255,255,255)

running = True

# Use a while loop
while running:
    screen.fill(blue) #fill with blue color

    for event in pygame.event.get():
        if event.type == pygame.QUIT:
            running = False
            pygame.quit()

    time_now = datetime.now()

    # split the time variable as minutes and hour and convert back to integer.
    minute = time_now.strftime('%M:%S')
    hour = int(time_now.strftime('%H'))

    # Subtract 12 from the hour variable if it's greater than 12.
    if hour > 12:
        hour = hour - 12

    # Create a new time variable to store the hour and minute values as an f-string
    time = f'{hour}:{minute}'

    # Render the time text to be shown on the Pygame window and set the color of the text to be used.
    text= font.render(time,True,white)

    # define how the time text is shown on the Pygame window.
    screen.blit(text,(50,50))

    # update the time displayed.
    pygame.display.update()
Upon running the above code we should have our time displayed in the pygame window as shown below;
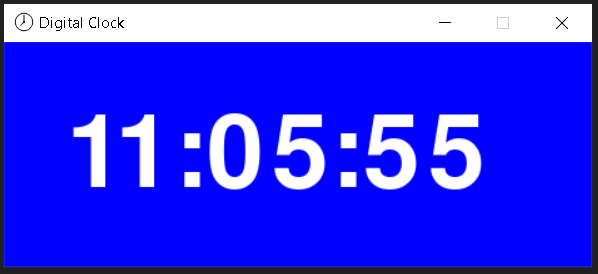
At this point, we see that the digital clock we’ve built using the pygame library is similar to that we built in part-1 using the TKinter library. But we need to make our digital clock a little cooler and add a digital font, a full date (the day of the week, the month, the day of the month, the year) and also we need to indicate whether its AM or PM since we’re using a 12 hour clock system.
Step-5: – Add a digital font
Download and install the digital font from here https://www.dafont.com/ds-digital.font. To install the font, unzip the downloaded file and select all the files ending with .TTF, right click and select “Install for all users“. If you just click install, it will not work. So for our digital-font, we’ll need two sizes of fonts that is a small font and a big font and we can create the two font variables as shown below;
# DS-Digital is the font name whereas 30 is the font size...
smallFont = pygame.font.SysFont('DS-Digital',30)
bigFont = pygame.font.SysFont('DS-Digital',135)
Step-6: – Set the Day, Month and Year
Here we will create two lists for both days (all days of the week) and months (all months in a year from 1 to 12). These will be captured as strings and then converted to integers as shown below;
# create lists for days and months...
days = ['Monday,', 'Tuesday,', 'Wednesday,' ,'Thursday,', 'Friday,', 'Saturday,', 'Sunday,']
months = ['January /', 'February /', 'March /', 'April /', 'May /', 'June /', 'July /', 'August /', 'September /', 'October /', 'November /', 'December /']

 today = datetime.today()

 year = time_now.strftime("%d / %Y")
 month = int(time_now.strftime('%m'))
 day = today.weekday()
 day = days[day]
 month = months[month-1]
Step-7: – Set “AM” or “PM”
Since we’re using a 12 hour clock format, we need to indicate whether it’s “AM” in the morning or it’s “PM” in the afternoon/evening. So basically, here we will create a variable called am and set it to “AM” and if the hour is greater than 12, then it will change to PM as shown below;
am = 'AM'

    if hour > 12:
        hour = hour - 12
        am = 'PM'
Step-7: – Create variables for the fonts to be displayed
Here we simply assign big and small fonts to the different texts to be displayed on the digital clock, that is, time, month, year, am and day texts. We also include the color for the texts as shown in the code snippet below;
  time_text = bigFont.render(time,True,green)
  month_text = smallFont.render(month, True, white)
  year_text = smallFont.render(year,True, white)
  am_text = smallFont.render(am, True, white)
  day_text = smallFont.render(day, True, white)
Step-8: – Define text-character positions
Here we are simply telling the program to align the different texts to be displayed on the pygame window where we want them to be displayed. You can alter these figures as you wish.
screen.blit(time_text, (15,15))
screen.blit(month_text, (150, 142))
screen.blit(year_text, (260, 142))
screen.blit(am_text, (380, 5))
screen.blit(day_text, (30, 142))
The final Code:
Here is the final code for part-2 (Using Pygame Library)
# Import the required libraries...
import pygame
from datetime import datetime

# Initialize pygame library
pygame.init()

# Add an icon to the Digital Clock window
icon = pygame.image.load('clock-icon.png')
pygame.display.set_icon(icon)

# Define the size of the pygame window and add a caption
screen = pygame.display.set_mode((470,180))
pygame.display.set_caption('Digital Clock')

# Add a digital font (DS-Digital) and specify the font size. Create two font kinds (small and big)
smallFont = pygame.font.SysFont('DS-Digital',30)
bigFont = pygame.font.SysFont('DS-Digital',135)

# Define the colors to be used
red = (255,0,0)
green = (0,255,0)
blue = (0,0,255)
white = (255,255,255)

 # create lists for days and months...
days = ['Monday,', 'Tuesday,', 'Wednesday,' ,'Thursday,', 'Friday,', 'Saturday,', 'Sunday,']
months = ['January /', 'February /', 'March /', 'April /', 'May /', 'June /', 'July /', 'August /','September /', 'October /', 'November /', 'December /']

running = True

# Use a while loop
while running:
    screen.fill(blue) #fill with blue color

    for event in pygame.event.get():
        if event.type == pygame.QUIT:
            running = False
            pygame.quit()

    time_now = datetime.now()
    today = datetime.today()

    # split the time variable as minutes and hour and convert back to integer.
    minute = time_now.strftime('%M:%S')
    hour = int(time_now.strftime('%H'))

    year = time_now.strftime("%d / %Y")
    month = int(time_now.strftime('%m'))
    day = today.weekday()
    day = days[day]
    month = months[month-1]

    # Set "AM" or "PM", Subtract 12 from the hour variable if it's greater than 12.
    am = 'AM'
    if hour > 12:
        hour = hour - 12
        am = 'PM'

    # Create a new time variable to store the hour and minute values as an f-string
    time = f'{hour}:{minute}'

    # Create variables for the texts to be displayed, stating the two kinds of fonts (big and small) plus the color of the text.
    time_text = bigFont.render(time, True, green)
    month_text = smallFont.render(month, True, white)
    year_text = smallFont.render(year, True, white)
    am_text = smallFont.render(am, True, white)
    day_text = smallFont.render(day, True, white)

    # Define text-character positions
    screen.blit(time_text, (15,15))
    screen.blit(month_text, (150, 142))
    screen.blit(year_text, (260, 142))
    screen.blit(am_text, (380, 5))
    screen.blit(day_text, (30, 142))

    # update the time displayed.
    pygame.display.update()
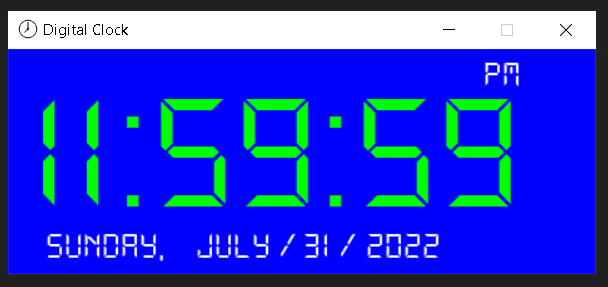
The final result of the Digital Clock:
Upon following the above steps, when you run the full code, you should get a digital clock like the one shown below;
References:
[1]. TKInter Documentation: https://docs.python.org/3/library/tkinter.html
[2]. Pygame Documentation: https://www.pygame.org/docs/
If you liked this project-tutorial, please subscribe to our YouTube Channel for more D.I.Y tutorials and projects.
Leave a comment down below incase you have any concerns…
Follow us on our different social media platforms:- LinkedIn, Facebook, Instagram, TikTok and Pinterest.

About the Author…
Tumusiime Kwiringira a.k.a Tum, is an embedded systems engineer, D.I.Y Life Hacker, Tech Blogger, YouTuber, Founder and Lead-Engineer at sonalabs.org. He’s passionate about innovation and building D.I.Y projects to inspire the young generation in the fields of Mechatronics and Artificial Intelligence… Read more…


