How to build your own YouTube Downloader using Python
In this project-tutorial, we will be learning how to build our own YouTube downloader using Python. This downloader will be able to download single video(s) and playlists (multiple videos at once) from the YouTube platform.
Requirements:
1 – Python 3.0 and above
2 – PyCharm IDE or Visual Studio Code IDE or Anaconda (Jupyter Notebook) or any other IDE of your choice.
For this tutorial, we shall follow the steps below;
Step-1: Install and Import the required libraries
Create a new python file in your IDE and give it a name of your choice. The main library packages that we will be using for this project are tkinter, pytube and os. Unlike pytube, tkinter and os libraries comes pre-installed with Python, so we only need to install pytube and import it as shown below;
Run the code snippet below in the Terminal window of your IDE or in a new cell of Anaconda (Jupyter Notebook) to install pytube.
pip install pytubeAbout the required Libraries
- tkinter library
Tkinter is an acronym for “Tk interface”. Tk was developed as a GUI extension for the Tcl scripting language. Tkinter or Tk interface is Python’s de-facto standard GUI (Graphical User Interface) package and is included in all standard Python Distributions. In fact, it’s the only framework built into the Python standard library.
- pytube library
This library (pytube) is a lightweight, Pythonic, dependency-free, library (and command-line utility) for downloading YouTube Videos.
- os library
The OS module in Python helps you interact with the underlying operating system by providing functions for creating and removing a directory (folder), fetching its contents, changing and identifying the current directory, etc.
To import the above libraries, just simply write these lines of code.
from tkinter import *
from tkinter import filedialog,messagebox
import os
from pytube import YouTube,Playlist
Step-2: Create a blank window
For this project, we will begin by creating a blank GUI window. To do this, we write the code below and in this code, the first line means we import all classes and methods from the tkinter library module. The class that makes the GUI window is the Tk() class inside the tkinter library module and this is assingned to the object root. So upon running this code with just the two lines, we will not see anything, so in order to be able to see the GUI we need to add another line of code that keeps the GUI window open always until it’s closed by using the “mainloop()” method which is inside the Tk() class onto the object “root”. It should be noted that every other code(s) will be written between the two lines of code that is; between “root=Tk()” and “root.mainloop()”.
from tkinter import *
root=Tk()
root.mainloop()
Step-3: Set title, add icon, background, and geometry.
In the next step, we will give the application a title, add an icon, set the desired background color plus also set its geometry and make it un-resizable.
To achieve this, we need to use the following lines of code. Ensure to have the image of the icon you intend to use in your project file.
root.title('Tanzanite Downloader')
root.config(bg='green4')
icon = PhotoImage(file = 'yt-logo.png')
root.iconphoto(False, icon)
root.geometry('605x400')
root.resizable(False,False)
Step-4: Create frames, the outer and inner frames
Here, we will be creating two frames with the help of a frame class where the outer frame will house everything including the inner frame and its contents.
To create the outer frame, align it, add a logo of the app and align it too, we will write the following lines of code; The outer frame will not be visible until you add contents to it. So in the code below, we add an image to the outer frame and align it as we desire using the grid method.
outerframe = Frame(root) #pass root in the frame class.
outerframe.grid(row=0, column=0, pady=10, padx=10)

logoImage = PhotoImage(file='yt-logo2.png')
logoLabel = Label(outerframe, image=logoImage)
logoLabel.grid(row=0, column=0, pady=15)
For the inner frame, we will use the 3 lines of code below. This will house the two radio buttons that is; the single video option and the playlist videos option. We shall add a label frame of the inner frame within the outer frame. For this case, we shall add text “Select download type” and also use the grid method to align it as desired.
innerframe = LabelFrame(outerframe, text='Select Download Type', font=('myriad pro black', 15, 'bold'))
innerframe.grid(row=1, column=0, pady=15)
Step-5: Add radio button options to the inner frame
Here we will have two options, the single video option and the playlist videos option and to create these options, we shall use the code below; In the code below, we add images onto the two video download type options, create variables to store these radio button methods, add the texts, add logo images and align the contents as desired using the grid method within the inner frame for both options as shown in the code below.
radioImage = PhotoImage(file='single-video.png')
vidradioButton = Radiobutton(innerframe, image=radioImage, text='Single Video', font=('myriad pro black', 11, 'bold'), compound=LEFT, relief='solid',variable=check,value=1)
vidradioButton.grid(row=0, column=0, padx=12, pady=12)

playlistImage = PhotoImage(file='video-playlist.png')
playlistradioButton = Radiobutton(innerframe, image=playlistImage, text='Playlist Videos',
                                  font=('myriad pro black', 11, 'bold'), compound=LEFT, relief='solid',variable=check,value=2)
playlistradioButton.grid(row=0, column=1, padx=12, pady=12)
Step-6: Add a URL Entry filed
The URL entry field serves to capture the URL link of the video from YouTube. To add this field, we use the code below.
# Add URL Entry field
text = StringVar()
url_entryField = Entry(outerframe, width=70, font=('myriad pro black', 11), justify='center', textvariable=text, fg='gray')
url_entryField.grid(row=2, column=0, padx=10, pady=20)
text.set('Paste your video URL here...')
Step-7: Create a function to delete text in the URL entry field
Here we create a function whose purpose is to delete the text (in this case the previous URL text) in the entry field and to achieve this, we will use the code below. This works by left clicking on the mouse while within the URL entry field.
# create a function to delete entity
def click(event):
    url_entryField.delete(0, END) # Delete the text in the Entry field
    url_entryField.config(fg='black')

url_entryField.bind('<Button-1>', click)
Step-8: Add a Download button
Here will be adding the main download button in the outer frame of the application which when clicked after selecting the video type of choice, it will prompt you to first of all choose a location to save your video(s). The code to add this button functionality is shown below.
# Add Download Button
downloadImage = PhotoImage(file='download.png')
downloadButton = Button(outerframe,image=downloadImage,command=download)
downloadButton.grid(row=3, column=0, pady=20)
Step-9: Adding functionality to the download button
Here we will begin with defining a function “def download()” for downloading the videos, that when we click on the download button, we get a complete path of the selected directory and then also get the URL link of the video to be downloaded.
def download():
    get_path=filedialog.askdirectory() #get the complete path of the selected directory
    link_url=text.get() #get URL
Step-10: Add functionality to the radio buttons
Without the functionality behind the radio buttons, these will just not work. So to do this, we will write the code as shown below. In the first part, if the first option (Single video) is selected, then the link of the video will be fetched/obtained from YouTube, a message will be shown to alert the user that the download has started, and also when the download is finished successfully or not plus the chosen directly for saving the file will be opened automatically. This same functionality applies to option two (selecting the playlist), and if none is selected, upon clicking the download button, you will be shown a message alert telling you to please first select video download type before you click the download button.
 # Add functionality to the Radio Buttons.
    if check.get()==1:
        #download video corresponding to the URL.
        yt=YouTube(link_url)
        messagebox.showinfo('Message Alert...!!!', 'Video downloading, please wait...')
        yt.streams.get_highest_resolution().download(get_path)
        #display a message-box to show download successful.
        messagebox.showinfo('Success','Video download is Successfull...')
        #open the download folder automatically.
        os.startfile(get_path)

    if check.get()==2:
        # download playlist corresponding to the URL.
        yt_pl = Playlist(link_url)
        for videos in yt_pl.videos:
            messagebox.showinfo('Message Alert...!!!', 'Playlist downloading, please wait...')
            videos.streams.get_highest_resolution().download(get_path)
        # display a message-box to show playlist download is successful.
        messagebox.showinfo('Success','Your Playlist download is Successfull...')
        # open the download folder automatically.
        os.startfile(get_path)

    elif check.get()==0:
        messagebox.showinfo('Message Alert...!!!', 'Please first select video download type...')
Then finally we need to store the value of the radio button as shown in the code below;
#store value of the radio button
check=IntVar()
The Full Code
Below is the full code, feel free to alter it to your liking.
from tkinter import *
from tkinter import filedialog,messagebox
import os
from pytube import YouTube,Playlist

# The functionality of the Objects in the App.
def download():
    get_path=filedialog.askdirectory() #get the complete path of the selected directory
    link_url=text.get() #get URL

    # Add functionality to the Radio Buttons.
    if check.get()==1:
        #download video corresponding to the URL.
        yt=YouTube(link_url)
        messagebox.showinfo('Message Alert...!!!', 'Video downloading, please wait...')
        yt.streams.get_highest_resolution().download(get_path)
        #display a message-box to show download successful.
        messagebox.showinfo('Success','Video download is Successfull...')
        #open the download folder automatically.
        os.startfile(get_path)

    if check.get()==2:
        # download playlist corresponding to the URL.
        yt_pl = Playlist(link_url)
        for videos in yt_pl.videos:
            messagebox.showinfo('Message Alert...!!!', 'Playlist downloading, please wait...')
            videos.streams.get_highest_resolution().download(get_path)
        # display a message-box to show playlist download is successful.
        messagebox.showinfo('Success','Your Playlist download is Successfull...')
        # open the download folder automatically.
        os.startfile(get_path)

    elif check.get()==0:
        messagebox.showinfo('Message Alert...!!!', 'Please first select video download type...')


#Creating the GUI of the Application.
root = Tk()
root.title('Tanzanite Downloader')
# root.iconphoto()
root.config(bg='green4')
icon = PhotoImage(file = 'yt-logo.png')
root.iconphoto(False, icon)
root.geometry('605x400')
root.resizable(False,False)

outerframe = Frame(root)
outerframe.grid(row=0, column=0, pady=10, padx=10)

logoImage = PhotoImage(file='yt-logo2.png')
logoLabel = Label(outerframe, image=logoImage)
logoLabel.grid(row=0, column=0, pady=15)

innerframe = LabelFrame(outerframe, text='Select Download Type', font=('myriad pro black', 15, 'bold'))
innerframe.grid(row=1, column=0, pady=15)

#store value of the radio button
check=IntVar()

radioImage = PhotoImage(file='single-video.png')
vidradioButton = Radiobutton(innerframe, image=radioImage, text='Single Video', font=('myriad pro black', 11, 'bold'),
                             compound=LEFT, relief='solid',variable=check,value=1)
vidradioButton.grid(row=0, column=0, padx=12, pady=12)

playlistImage = PhotoImage(file='video-playlist.png')
playlistradioButton = Radiobutton(innerframe, image=playlistImage, text='Playlist Videos',
                                  font=('myriad pro black', 11, 'bold'), compound=LEFT, relief='solid',variable=check,value=2)
playlistradioButton.grid(row=0, column=1, padx=12, pady=12)

# Add URL Entry field
text = StringVar()
url_entryField = Entry(outerframe, width=70, font=('myriad pro black', 11), justify='center', textvariable=text,
                       fg='gray')
url_entryField.grid(row=2, column=0, padx=10, pady=20)
text.set('Paste your video URL here...')


# create a function to delete entity
def click(event):
    url_entryField.delete(0, END) # Delete the text in the Entry field
    url_entryField.config(fg='black')

url_entryField.bind('<Button-1>', click)

# Add Download Button
downloadImage = PhotoImage(file='download.png')
downloadButton = Button(outerframe,image=downloadImage,command=download)
downloadButton.grid(row=3, column=0, pady=20)

root.mainloop()
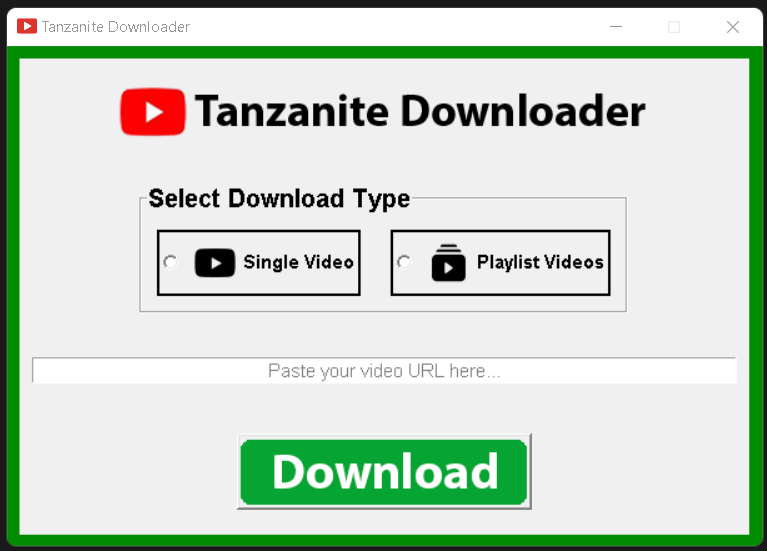
The Final Outcome:- The Tanzanite Downloader
Upon running the full code above, you will definitely have your downloader where you can either choose to download a single video or a playlist of videos. To use this downloader, it’s pretty easy, here is how;- select your preferred download type, paste your video URL link copied from YouTube and then hit Download. You will have to first choose where the video(s) will be saved and That’s it…!!! After your video(s) is done downloading, you will get a notification.

References:
[1]. tkinter documention: https://docs.python.org/3/library/tk.html
[2]. Pytube Documentation: https://pytube.io/en/latest/
If you liked this project-tutorial, please subscribe to our YouTube Channel for more D.I.Y tutorials and projects.
Leave a comment down below incase you have any concerns…
Follow us on our different social media platforms;- LinkedIn, Facebook, Instagram, TikTok, & Pinterest.

About the Author…
Tumusiime Kwiringira a.k.a Tum, is an embedded systems engineer, D.I.Y Life Hacker, Tech Blogger, YouTuber, Founder and Lead-Engineer at sonalabs.org. He’s passionate about innovation and building D.I.Y projects to inspire the young generation in the fields of Mechatronics and Artificial Intelligence… Read more…


